Introduction
Installing a CPU cooler may seem intimidating at first, but with the right guidance, it’s a straightforward task that can make a significant difference in your PC’s performance. Whether you’re a beginner or a seasoned builder, understanding the ins and outs of this process can help you keep your system running cool and efficient. This guide will walk you through everything you need to know about installing a CPU cooler, from choosing the right one to troubleshooting common installation issues. Ready to dive in? Let’s get started!
1. What is a CPU Cooler and Why Do You Need One?
When you hear the term “CPU cooler,” you might picture a large block of metal with a fan attached to it. But here’s the kicker: a CPU cooler is essential for maintaining the health of your processor. The CPU (Central Processing Unit) is the brain of your computer, and like any brain, it generates heat when it’s working. Without proper cooling, that heat can build up, leading to overheating, system instability, and even permanent damage to the hardware.
So, why do you need a CPU cooler? Well, heat is one of the biggest enemies of computer performance. When the CPU gets too hot, it can throttle performance to prevent damage, or in extreme cases, cause the system to crash entirely. Installing a CPU cooler helps prevent this by actively removing excess heat, ensuring that your system runs at optimal speeds and lasts longer.
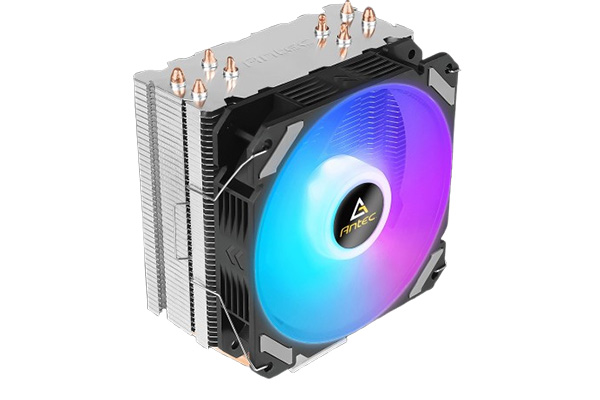
But here’s the thing: not all coolers are created equal. There are air coolers and liquid coolers, each with their pros and cons. Understanding the difference between these types and their benefits is crucial in choosing the right one for your build. Air coolers are generally more affordable, quieter, and easier to install. Liquid coolers, on the other hand, provide superior cooling performance and are typically better suited for high-performance systems or overclocking.
Now that you understand the importance of a CPU cooler, let’s take a closer look at how these devices work.
Table 1: Types of CPU Coolers
| Cooler Type | Description | Pros | Cons |
|---|---|---|---|
| Air Cooler | Uses fans and heat sinks to dissipate heat | Affordable, Easy to Install, Quiet | Less efficient in extreme cases |
| Liquid Cooler | Uses liquid to transfer heat away from the CPU | Superior Cooling, Great for Overclocking | More Expensive, Harder to Install |
2. How Does a CPU Cooler Work?
At this point, you might be wondering, “What’s the real story behind how a CPU cooler works?” Let’s break it down. A CPU cooler’s primary function is to remove heat from the processor. When the CPU is under load, it generates heat, which needs to be transferred away to prevent damage. The cooler does this by using materials that are excellent conductors of heat, like copper or aluminum, combined with fans or liquid.
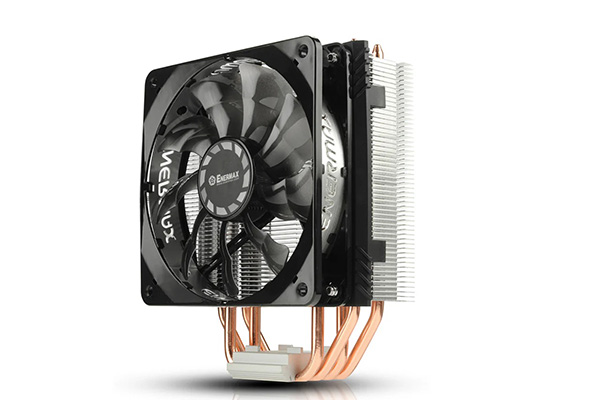
In an air cooler, the heat from the CPU is absorbed by the heat sink—usually a large block of metal with fins that increase surface area. These fins help dissipate the heat into the air. The attached fan then blows air over the fins, speeding up the heat dissipation process.
Liquid coolers operate a bit differently. Instead of using a heat sink and fan, liquid coolers use a closed loop of coolant to carry heat away from the CPU. This coolant travels through tubes to a radiator, where it is cooled by additional fans. This process allows for more efficient heat transfer and is especially useful for high-performance CPUs that generate a lot of heat.
But here’s where it gets interesting: both air and liquid coolers have their strengths and weaknesses, and understanding these will help you make the right choice for your system.
Table 2: How CPU Coolers Work
| Cooler Type | Cooling Mechanism | Efficiency | Ideal Use |
|---|---|---|---|
| Air Cooler | Heat sink + fan | Moderate | Budget Builds, Low to Mid-range CPUs |
| Liquid Cooler | Closed-loop coolant system | High | High-end CPUs, Overclocking |
3. When Should You Install a CPU Cooler?
It’s clear that installing a CPU cooler is essential for performance, but when exactly should you install one? You might be wondering if this is something you can put off. But here’s the deal: the sooner you install a CPU cooler, the better. Cooling is a critical part of ensuring your system runs smoothly.
You should install a CPU cooler if you are building a new PC or upgrading your system. Even if you are simply replacing an old cooler, it’s a good idea to make sure your CPU has proper cooling. If you’re noticing your system overheating or experiencing slowdowns under load, it’s definitely time for a cooler upgrade.
Overheating can occur due to several factors. A common reason for overheating is dust buildup, which can clog up the fans and prevent proper airflow. Another issue might be poor thermal paste application or an old, outdated cooler that can no longer handle the heat generated by newer, more powerful CPUs.
It’s also crucial to consider the type of CPU you’re using. For standard processors, a basic air cooler might suffice. However, for overclocked systems or high-performance CPUs, you’ll need a more robust solution like a liquid cooler to keep temperatures in check.
Table 3: Signs You Need to Install a New CPU Cooler
| Sign of Overheating | Possible Cause | Solution |
|---|---|---|
| System crashes under load | Insufficient cooling | Install a new, more powerful cooler |
| CPU temperatures above 80°C | Poor thermal paste or old cooler | Reapply thermal paste or upgrade cooler |
| Fan noise or vibrations | Dust buildup | Clean or replace the cooler |
4. What Tools Do You Need to Install a CPU Cooler?
Now that you know why installing a CPU cooler is crucial, let’s talk about what tools you’ll need for the job. Ready for the good part? Installing a CPU cooler is a relatively simple process, but having the right tools can make it much easier.
First and foremost, you’ll need a screwdriver to attach the cooler to the motherboard. It’s recommended to use a magnetic screwdriver, as this will help prevent screws from falling into your case. If you’re working with a liquid cooler, you may also need thermal paste and a cleaning wipe to apply a fresh layer of paste onto the CPU. Speaking of thermal paste, it’s essential to use high-quality paste to ensure proper heat transfer.
Some coolers come with additional mounting hardware, so make sure you check the cooler’s manual to verify the installation process. If you’re installing a large air cooler, you may need extra space to maneuver the cooler into place, so it’s best to do this in an open space with good lighting.
Finally, you’ll want a microfiber cloth to clean off any old thermal paste from the CPU before applying a fresh layer. Make sure you take your time with this step, as proper paste application is crucial to the effectiveness of your cooler.
Table 4: Tools Needed for CPU Cooler Installation
| Tool | Purpose |
|---|---|
| Screwdriver | To secure the cooler |
| Thermal Paste | To improve heat transfer |
| Microfiber Cloth | To clean the CPU surface |
| Mounting Hardware | To attach the cooler securely |
5. How to Choose the Right CPU Cooler?
Choosing the right CPU cooler is one of the most important decisions you’ll make when building or upgrading your system. It’s not just about picking something that looks cool—it’s about ensuring your CPU stays cool! But what factors should you consider when selecting a cooler?
The first thing to look at is compatibility. Not all coolers fit all CPUs, so check the cooler’s specifications to ensure it’s compatible with your processor and motherboard. Also, be sure to consider the space available inside your case. Larger air coolers or liquid coolers may not fit in compact cases.
Next, think about performance. If you’re building a high-performance gaming PC or planning to overclock your CPU, you’ll need a cooler that can handle extra heat. Liquid coolers generally offer better performance in this regard, but air coolers are often sufficient for most tasks.
Lastly, don’t forget about noise levels. Some coolers are loud and may disrupt your experience, while others are designed to operate quietly. Pay attention to fan noise ratings, especially if you plan on building a quiet PC setup.
Table 5: Choosing the Right CPU Cooler
| Factor | Air Cooler | Liquid Cooler |
|---|---|---|
| Compatibility | Good for most cases | Requires space for radiator |
| Performance | Sufficient for standard CPUs | Best for overclocked or high-end CPUs |
| Noise | Quieter operation | Can be louder under load |
6. What Are the Key Features of a Good CPU Cooler?
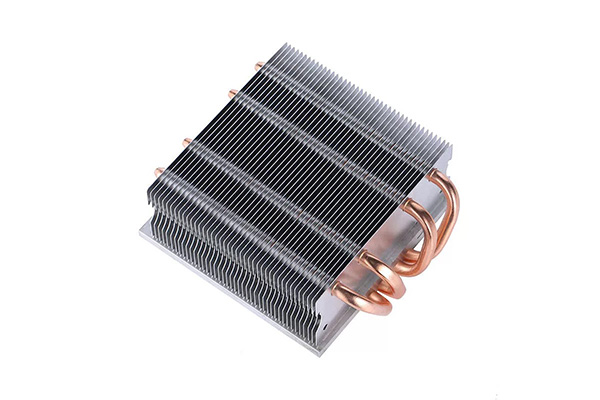
So, you’ve picked out the right cooler, but what makes a CPU cooler “good”? What are the must-have features you should look for? Let’s dig into the details. A good CPU cooler should offer efficient heat dissipation, reliable performance, and durability. The material of the heat sink, the fan speed, and the overall design all play critical roles.
For efficient heat dissipation, copper or aluminum heat sinks are ideal. These materials conduct heat quickly, ensuring that the heat is removed from the CPU without delay. The fan speed is also crucial. Look for coolers with fans that can spin at higher RPMs for faster heat removal, but keep an eye on noise levels.
Another important factor is durability. A high-quality cooler will last for years, with little to no degradation in performance. A quality cooler will also be easier to maintain and clean, reducing the risk of dust buildup.
But wait, there’s more—let’s look at what features set high-end coolers apart from the rest.
Table 6: Key Features of a Good CPU Cooler
| Feature | Description |
|---|---|
| Heat Dissipation | Copper or aluminum heat sinks for fast cooling |
| Fan Speed | High RPM fans for efficient heat removal |
| Durability | Long-lasting, easy-to-maintain build |
Conclusion
In conclusion, installing a CPU cooler is a critical step in ensuring your system runs efficiently and performs optimally. By understanding the different types of coolers, how they work, and when to install them, you can make the right choice for your PC build. Keep in mind the importance of choosing the right cooler for your system’s needs, and take your time during installation to avoid common mistakes. With the right cooler in place, you’ll enjoy better system performance and longevity. Now, let’s move on to the FAQ section to answer some common questions.
7. How to Prepare Your PC for CPU Cooler Installation?
Before diving into the actual installation of your CPU cooler, preparation is key. You don’t want to rush this step, as the success of your cooler’s installation depends on the groundwork you lay out. So, what’s the first step? Turn off the power to your system. This might seem like a no-brainer, but you would be surprised at how often people forget to do this. Disconnect your power supply, unplug peripherals like the keyboard and mouse, and be sure to also remove any connected cables.
Now, let’s move on. Remove the old cooler (if you’re replacing one). This can sometimes be tricky, especially if your current cooler has been in place for a while. If the cooler is stuck, gently twist it, but be careful not to force it. Next, you’ll want to clean the CPU and surrounding components. Use a lint-free cloth to wipe away any thermal paste left on the CPU. If you need a deeper clean, use some isopropyl alcohol to ensure all residue is removed, as any leftover paste can interfere with heat transfer.
But here’s where it gets interesting: you’ll also want to check the thermal paste. If the old paste is dried up or unevenly applied, this is the perfect time to refresh it with a new layer. Apply a small, pea-sized amount of paste in the center of the CPU, and it will spread evenly when the cooler is attached. Once the area is cleaned and prepped, you’ll be ready for the installation.
Table 7: Preparation Checklist
| Step | Action |
|---|---|
| Turn off the power | Disconnect power supply and unplug peripherals |
| Remove old cooler | Gently twist and remove the cooler |
| Clean CPU and surrounding components | Wipe off thermal paste with a lint-free cloth |
| Reapply thermal paste | Apply a small, pea-sized amount of fresh thermal paste |
8. Step-by-Step Guide: How to Install a CPU Cooler
Here comes the good part: the step-by-step guide! Once your PC is prepped, it’s time to install the new CPU cooler. Let’s break it down.
Step 1: Remove any old thermal paste. If you’re replacing an existing cooler, carefully remove any old thermal paste from the CPU with isopropyl alcohol and a lint-free cloth. Ensuring that the surface is completely clean is vital for achieving good heat transfer.
Step 2: Apply thermal paste. Place a small, pea-sized amount of thermal paste in the center of the CPU. This amount will spread evenly as the cooler is applied.
Step 3: Install the cooler base. Now, it’s time to install the cooler’s base onto the CPU. Carefully align the base with the mounting brackets on your motherboard. Press down gently and secure the cooler in place. Use the screws that came with your cooler and tighten them in a cross pattern to ensure even pressure distribution.
Step 4: Attach the fan and connect the power. After securing the cooler, it’s time to attach the fan. Align the fan with the cooler and mount it accordingly. Once in place, connect the fan’s power cable to the appropriate header on the motherboard. Be sure that the fan spins freely without any obstruction. Now, your CPU cooler is securely in place and ready to perform.
Table 8: CPU Cooler Installation Steps
| Step | Action |
|---|---|
| Step 1 | Remove old thermal paste with alcohol |
| Step 2 | Apply new thermal paste to the CPU |
| Step 3 | Install cooler base and secure with screws |
| Step 4 | Attach fan and connect power cable |
9. How to Mount the CPU Cooler Correctly?
Mounting the CPU cooler may seem straightforward, but there are a few key steps to ensure you do it correctly. Align the cooler carefully with the CPU socket. Most coolers have a bracket that needs to line up with the holes on the motherboard. Once the cooler is aligned, attach it to the motherboard using the screws provided. When tightening the screws, tighten them in a cross pattern—this ensures the pressure is evenly distributed across the cooler and the CPU.
Here’s the kicker: don’t overtighten the screws. Doing so could damage the motherboard or CPU. A gentle, firm tightening is all that’s needed. Also, check for any gaps between the cooler and the CPU. If the cooler isn’t making good contact with the CPU, it could result in poor heat transfer, causing overheating. If there are gaps, loosen the screws and try again until you get an even fit.
Table 9: Mounting the CPU Cooler Correctly
| Step | Action |
|---|---|
| Align the cooler | Carefully line it up with the CPU socket |
| Attach the cooler | Secure it with screws using a cross pattern |
| Tighten the screws | Tighten gently to avoid damaging the motherboard |
10. How to Connect the Cooler Fan to Your Motherboard?
Now, you’re almost there! Connecting the fan to your motherboard is a simple yet essential step in the CPU cooler installation process. Every cooler comes with a fan that requires power, and this fan is controlled by the motherboard.
Locate the fan header on your motherboard. It’s typically labeled “CPU_FAN” or something similar. Plug the fan’s power cable into the corresponding header, making sure it fits snugly. If the cooler comes with RGB or additional features, you may also need to connect these cables to the motherboard or controller.
But wait, there’s more: check the fan rotation. Make sure the fan is installed in the right orientation, so it’s blowing air in the correct direction. Typically, the fan should blow air toward the rear of the case to ensure proper airflow. If the fan is mounted upside down, it can reduce the effectiveness of the cooler.
Table 10: Connecting the CPU Cooler Fan
| Step | Action |
|---|---|
| Locate the fan header | Find the “CPU_FAN” header on your motherboard |
| Plug the fan in | Connect the fan’s power cable |
| Check fan orientation | Ensure the fan blows air towards the rear of the case |
11. What Should You Do After Installing the CPU Cooler?
Once the CPU cooler is installed, don’t rush into powering on your system. First, double-check your work. Make sure the cooler is secure, the thermal paste is applied correctly, and the fan is connected. Then, reconnect the power supply and plug in your peripherals.
The next step is testing. Power on your PC and monitor the CPU temperature. You can use software like Core Temp or HWMonitor to check the temperature readings. The CPU temperature should remain within a safe range (generally between 30°C and 70°C under load, depending on your cooler and CPU). If the temperature is too high, you may need to reseat the cooler or reapply the thermal paste.
But here’s the kicker: run a stress test to push the CPU to its limits. This will ensure that the cooler is functioning properly under load. If everything checks out, you’re good to go.
Table 11: CPU Cooler Testing Checklist
| Step | Action |
|---|---|
| Double-check installation | Ensure the cooler is secure and fan is connected |
| Power on the system | Turn on your PC and monitor CPU temperatures |
| Run a stress test | Use software to test CPU temperature under load |
12. How Can You Troubleshoot Issues After Installation?
If you’re experiencing issues after installing your CPU cooler, don’t panic! It’s not uncommon to run into a few problems. One of the most common issues is overheating despite the cooler being installed properly. If this happens, check if the cooler is seated correctly and whether the thermal paste has been applied evenly. Another issue could be the fan’s speed. If the fan is spinning too slowly, check the connection and verify that the fan header is working correctly.
If the cooler seems too noisy, you might have an issue with the fan blades rubbing against something. Make sure the fan is properly mounted, and if it’s still noisy, consider replacing it with a quieter model.
Table 12: Troubleshooting Common Cooler Issues
| Issue | Possible Cause | Solution |
|---|---|---|
| Overheating | Poor thermal paste application or seating | Reseat the cooler and reapply thermal paste |
| Slow fan speed | Incorrect fan connection | Check the fan header and connection |
| Excessive noise | Fan rubbing against something | Check fan clearance and mounting |
13. How to Maintain and Clean Your CPU Cooler?
Regular maintenance is key to ensuring your CPU cooler continues to perform at its best. Cleaning your cooler is essential for maintaining efficient airflow and heat dissipation. Dust buildup is one of the biggest culprits in reducing a cooler’s efficiency. To clean the cooler, first, turn off your PC and disconnect all power sources. Remove the cooler from the CPU and use compressed air to blow dust out of the fins and fan blades.
Once the cooler is clean, it’s a good idea to check the thermal paste. If the paste has dried out or has been in use for over a year, consider reapplying it. This ensures that the heat transfer between the CPU and cooler remains optimal.
But here’s the kicker: cleaning the cooler every 6-12 months can prevent long-term performance issues and extend the life of your CPU cooler.
Table 13: CPU Cooler Maintenance Checklist
| Step | Action |
|---|---|
| Turn off your PC | Disconnect power before cleaning |
| Remove dust | Use compressed air to clear dust from the cooler |
| Reapply thermal paste | Ensure optimal heat transfer |
14. What Are the Benefits of Upgrading Your CPU Cooler?
Upgrading your CPU cooler can bring several benefits, particularly if you’re looking for better performance or quieter operation. For example, liquid coolers can handle higher thermal loads, making them ideal for overclocking. Upgrading to a better cooler can also result in lower noise levels. Many high-end air coolers and liquid coolers come with noise-dampening features, making them much quieter than stock coolers.
Another benefit of upgrading is the improved longevity of your CPU. Overheating can cause wear and tear on the processor over time. By keeping your CPU cool, you ensure it lasts longer and performs better.
Table 14: Benefits of Upgrading Your CPU Cooler
| Benefit | Air Cooler | Liquid Cooler |
|---|---|---|
| Cooling Efficiency | Sufficient for most users | Superior cooling for overclocking |
| Noise Level | May be louder under load | Generally quieter with noise-dampening features |
| CPU Longevity | Helps prevent overheating | Reduces wear and tear on the CPU |
15. Are There Any Risks to Installing a CPU Cooler Incorrectly?
Yes, there are risks associated with incorrectly installing a CPU cooler. One of the biggest risks is overheating. If the cooler isn’t seated properly or thermal paste is applied incorrectly, the CPU may not receive the necessary cooling, leading to high temperatures and potential damage.
Other risks include damaging the motherboard or CPU socket from overtightening screws, or air bubbles forming in liquid coolers, which can reduce cooling efficiency. To avoid these risks, make sure you follow the installation instructions carefully and double-check all connections.
Table 15: Risks of Incorrect CPU Cooler Installation
| Risk | Consequence | Solution |
|---|---|---|
| Overheating | CPU damage, system instability | Ensure proper seating and thermal paste application |
| Damaging components | Motherboard or CPU socket damage | Tighten screws gently and evenly |
| Air bubbles in liquid cooler | Reduced cooling efficiency | Ensure proper installation and check for air pockets |
FAQ Section
Q1: What is a CPU cooler?
A CPU cooler is a device that helps dissipate heat from your processor, ensuring that it stays cool and performs optimally.
Q2: How does a CPU cooler work?
A CPU cooler works by transferring heat away from the CPU using materials like copper or aluminum, combined with fans or liquid coolant to dissipate the heat.
Q3: How do I know when I need to install a new CPU cooler?
If your CPU is overheating, causing system crashes, or if your current cooler is old and ineffective, it’s time to install a new cooler.
Q4: What is the difference between an air and liquid CPU cooler?
Air coolers use fans and heat sinks to dissipate heat, while liquid coolers use coolant to transfer heat away from the CPU and to a radiator for more efficient cooling.
Q5: How often should I clean my CPU cooler?
It’s recommended to clean your CPU cooler every 6 to 12 months to prevent dust buildup and maintain optimal cooling efficiency.
