Giới thiệu
When it comes to keeping your computer running efficiently, installing a CPU cooler is one of the most important steps. Overheating can cause your CPU to throttle, leading to lower performance or even hardware damage. This guide will take you through the process of installing a CPU cooler, step by step, ensuring that you can keep your system cool and running smoothly.

1. What is a CPU Cooler and Why Do You Need One?
A CPU cooler is an essential component that helps maintain the operating temperature of your processor. Without it, the CPU would quickly overheat, leading to system crashes or permanent damage. But here’s the kicker—there are different types of coolers, and understanding their role can help you make the right choice for your system.
The primary function of a CPU cooler is to dissipate heat away from the processor. Since CPUs process billions of instructions every second, they generate significant heat. If this heat isn’t managed properly, it can cause the CPU to become unstable, leading to crashes or performance issues. That’s why installing a proper CPU cooler is vital for the longevity and performance of your PC.
There are two main types of CPU coolers: air coolers and liquid coolers. Air coolers use a fan to push heat away from the CPU, while liquid coolers use a pump and a closed-loop liquid system to move heat away from the CPU and into a radiator. Each has its advantages and disadvantages, but understanding the basic concepts will help you choose the best one for your needs.
| Type of Cooler | Pros | Cons |
|---|---|---|
| Máy làm mát không khí | Easy to install, affordable | May not handle high heat loads |
| Máy làm mát chất lỏng | Better for overclocking, quieter | More expensive, complex installation |
2. What Types of CPU Coolers Are Available?
When choosing a CPU cooler, it’s important to know what types are available and how they differ. Ready for the good part? Understanding the differences between air and liquid coolers will help you make an informed decision.
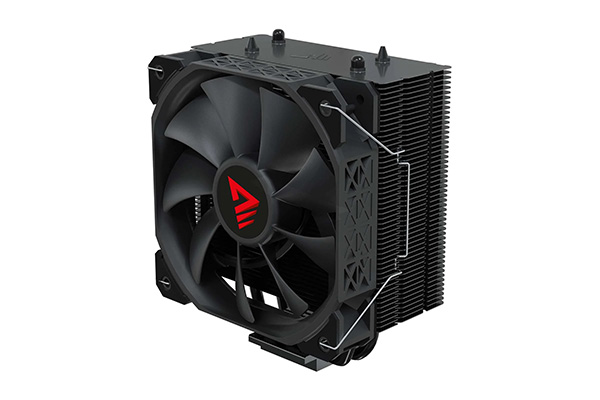
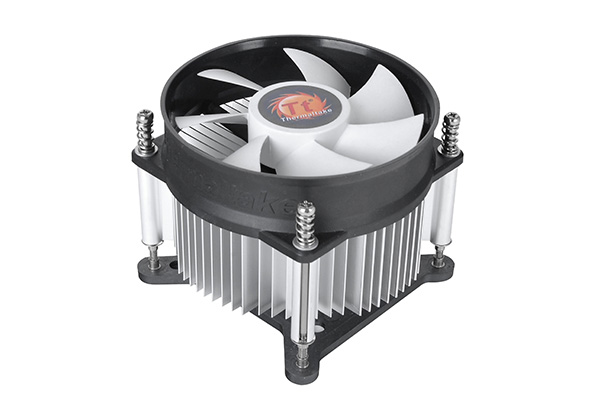
Máy làm mát không khí
Air coolers are the most common and easiest to install. They consist of a heatsink that absorbs heat from the CPU and a fan that blows the heat away. These coolers are cost-effective and reliable, making them a popular choice for most users.
Air coolers can come in a variety of sizes and designs, from low-profile models that fit in small cases to larger, more powerful versions capable of cooling high-performance CPUs. They are particularly suitable for users who don’t plan to overclock their CPU or need excessive cooling power.
Máy làm mát chất lỏng
Liquid coolers, on the other hand, provide superior cooling performance. They are often used in high-performance builds where overclocking is a priority. Liquid coolers typically consist of a pump, radiator, and hoses filled with coolant. The coolant circulates, pulling heat from the CPU and releasing it through the radiator.
While liquid coolers provide better cooling and are quieter, they come at a higher price point and are more complex to install. So, if you’re building a high-end gaming or workstation PC, a liquid cooler might be the better option.
| Loại máy làm mát | Best Use | Phạm vi giá |
|---|---|---|
| Máy làm mát không khí | General use, non-overclocking | $30 – $80 |
| Máy làm mát chất lỏng | Overclocking, high-performance | $80 – $200+ |
3. How Do You Choose the Right CPU Cooler for Your Build?
Choosing the right CPU cooler depends on several factors, including your system’s size, cooling needs, and budget. But here’s where it gets interesting: selecting the right cooler can make a significant impact on your PC’s performance and noise levels.
Case Size and Compatibility
Before buying a CPU cooler, it’s essential to check that it fits inside your case. If you’re building a compact system, a low-profile air cooler might be the best option. On the other hand, large cases may have space for bigger air coolers or even liquid coolers with large radiators.
CPU Compatibility
Make sure that the cooler you choose is compatible with your CPU socket. Different CPU models (Intel or AMD) use different socket types, so you’ll need to ensure that the cooler’s mounting bracket is compatible with your CPU.
Cooling Performance vs. Price
While high-end coolers offer better performance, they also come with a higher price tag. For users who don’t plan to overclock, a budget-friendly air cooler should suffice. For those pushing their systems to the limit, investing in a high-performance liquid cooler will provide better cooling and maintain system stability.
| Nhân tố | Budget Option | High-Performance Option |
|---|---|---|
| Case Compatibility | Compact air cooler | Large liquid cooler or tower |
| CPU Compatibility | Universal mounts | Specific mounts for advanced CPUs |
| Phạm vi giá | $30 – $80 | $100 – $200+ |
4. What Tools Do You Need to Install a CPU Cooler?
Installing a CPU cooler is a straightforward process, but having the right tools can make the job easier. So, what’s the real story here? The tools you need are basic, but ensuring you have them ready will help speed up the installation process.
At the very least, you’ll need a small screwdriver to attach the cooler to the motherboard. A thermal paste applicator (or simply a clean plastic card) is also necessary to apply thermal paste to the CPU. Depending on the cooler, you may also need a wrench for larger coolers, especially liquid coolers that require more careful attachment.
Having some rubbing alcohol and lint-free wipes on hand is important for cleaning the CPU surface before applying the thermal paste. Static-free work conditions are also essential, so a grounded wrist strap can prevent static electricity from damaging your components.
| Dụng cụ | Mục đích | Optional Tool |
|---|---|---|
| Small screwdriver | Attach cooler to motherboard | Torque wrench |
| Thermal paste | Create thermal contact | Thermal paste applicator |
| Alcohol wipes | Clean CPU surface | Lint-free cloth |
5. How Do You Prepare for CPU Cooler Installation?
Before jumping into the installation process, preparation is key. Here’s the kicker—proper preparation will not only make the process smoother but also reduce the risk of damage to your components.
Start by powering down your PC and unplugging it from the power source. Remove the side panel of your case to gain easy access to the motherboard. Then, carefully remove any old thermal paste from the CPU using rubbing alcohol and a lint-free cloth. This step is essential to ensure the new cooler has maximum contact with the CPU.
Next, make sure that the CPU cooler and case are compatible. Check that the cooler fits within your case, and that the fan can properly ventilate the air out of the case. With everything ready, you can move on to the installation itself.
| Bước chân | Sự miêu tả | Tool/Material Needed |
|---|---|---|
| Power down PC | Turn off and unplug PC | None |
| Clean CPU | Remove old thermal paste | Alcohol wipes, cloth |
| Check cooler fit | Ensure proper cooler and fan fit in case | None |
6. How Do You Install a CPU Cooler Step-by-Step?
Installing a CPU cooler is a multi-step process that requires precision. Ready for the good part? Let’s break it down step-by-step.
Step 1: Apply Thermal Paste
Start by applying a small amount of thermal paste to the center of the CPU. Use a small amount—about the size of a small grain of rice. This will spread out evenly when the cooler is attached.
Step 2: Attach the Cooler
For air coolers, align the mounting holes of the cooler with the motherboard’s CPU socket. Secure it by screwing the cooler into place. For liquid coolers, mount the pump onto the CPU and attach the radiator to your case. Secure the components with screws or brackets, depending on the cooler type.
Step 3: Connect the Fan
Now, connect the fan cable to the CPU fan header on your motherboard. Ensure the fan is facing the correct direction for optimal airflow.
| Bước chân | Sự miêu tả | Tool/Material Needed |
|---|---|---|
| Apply thermal paste | Place a small amount in the center of the CPU | Thermal paste |
| Attach cooler | Mount the cooler onto the CPU socket | Screws, screwdriver |
| Connect fan | Attach the fan power cable to motherboard | Fan cable |
7. How Do You Secure the Cooler for Maximum Performance?
Now that your CPU cooler is in place, the next critical step is ensuring it’s properly secured. But here’s where it gets interesting—getting the cooler perfectly attached is just as important as installing it in the first place. If it’s not secured properly, your CPU cooler won’t be able to dissipate heat effectively, which can cause your system to overheat.
Tighten the Screws Evenly
Once you’ve aligned the cooler, carefully screw it into place, but be sure to tighten the screws evenly. Over-tightening can cause damage to the cooler or motherboard, while under-tightening could lead to poor thermal contact. Start by tightening each screw a little at a time, moving in a crisscross pattern to ensure even pressure across the cooler base.
Check the Alignment
After securing the cooler, check its alignment. Make sure that it sits flat and firmly against the CPU. If it’s slightly off-center, it won’t transfer heat as efficiently. Proper alignment ensures that thermal paste is spread evenly across the surface of the CPU, maximizing cooling potential.
Verify the Cooler’s Stability
Before finishing up, gently try moving the cooler to ensure it doesn’t wiggle. If it does, you may need to tighten the screws a little more. A solidly attached cooler will provide the best cooling performance, so don’t rush through this step.
| Bước chân | Sự miêu tả | Tool/Material Needed |
|---|---|---|
| Tighten screws evenly | Secure cooler with an even, crisscross tightening pattern | Screwdriver |
| Check alignment | Ensure the cooler is flat and aligned on the CPU | None |
| Verify stability | Test cooler attachment to ensure no movement | None |
8. How Do You Connect the CPU Cooler to Your Motherboard?
Once your cooler is securely attached, the next task is connecting the cooler’s fan to your motherboard. This is crucial because the fan needs power to spin and dissipate heat. What’s the real story here? It’s a straightforward process, but ensuring the fan is connected properly is key for maintaining your system’s cooling.
Locate the CPU Fan Header
Start by locating the CPU fan header on your motherboard. This is where the fan’s power cable will connect. It’s usually located near the CPU socket. Some motherboards may have multiple fan headers, but look for the one labeled “CPU_FAN.”
Connect the Fan Power Cable
Once you’ve located the header, plug the fan’s power cable into the CPU fan header. Be sure to connect the cable in the correct orientation. Most fan connectors are designed to only fit one way, so you won’t risk connecting it incorrectly. Double-check the connection to ensure it’s secure.
Manage the Cables for Optimal Airflow
To optimize airflow, make sure that the fan cables don’t obstruct airflow within the case. Tidy up cables using cable ties or cable management clips. A clean build will not only improve cooling but also make it easier to maintain your system in the future.
| Bước chân | Sự miêu tả | Tool/Material Needed |
|---|---|---|
| Locate CPU fan header | Find the “CPU_FAN” header on the motherboard | None |
| Connect fan power cable | Securely attach the fan cable to the header | Fan power cable |
| Manage cables | Neatly arrange cables to improve airflow | Cable ties |
9. How Can You Test Your CPU Cooler After Installation?
Once the cooler is installed and connected, it’s time to test your system to ensure everything is working correctly. Ready for the good part? Testing your cooler will help you confirm that your CPU is staying at the right temperature and that the cooler is working as expected.
Boot Up the PC and Check for Fan Operation
After powering up your PC, listen carefully to ensure that the cooler fan is spinning. If the fan isn’t spinning, double-check the fan power connection and make sure it’s properly plugged into the CPU fan header.
Monitor the CPU Temperature
Use software tools like HWMonitor, CoreTemp, or your motherboard’s monitoring utility to check the CPU temperature. A healthy CPU should run at temperatures between 30°C and 50°C under normal conditions. If your temperature is consistently high, there could be an issue with the cooler’s installation.
Stress Test the CPU
For a more thorough test, you can run a stress test using software like Prime95 or AIDA64. These programs push your CPU to its limits, allowing you to observe how well your cooler performs under load. During the test, monitor the temperatures to ensure they don’t exceed 80°C for long periods. If temperatures rise too high, it might be time to check the cooler’s installation again.
| Bước chân | Sự miêu tả | Tool/Material Needed |
|---|---|---|
| Boot up and check fan | Ensure the fan spins when the system starts | None |
| Monitor CPU temperature | Use software to check temperature levels | HWMonitor, CoreTemp |
| Stress test the CPU | Run a stress test to push the system to its limits | Prime95, AIDA64 |
10. What Are Common Mistakes to Avoid When Installing a CPU Cooler?
Installing a CPU cooler can be a simple task, but there are several common mistakes that could undermine your efforts. So, what’s the real story here? Avoiding these mistakes will ensure your cooler performs efficiently and protects your system from overheating.
Using Too Much or Too Little Thermal Paste
One of the most common mistakes is applying too much or too little thermal paste. Too much paste can spill over the sides, causing an uneven application and less effective heat transfer. On the other hand, too little paste can result in gaps between the CPU and cooler, leading to overheating. The key is to use a small, pea-sized amount in the center of the CPU.
Forgetting to Check Compatibility
It’s easy to assume that any cooler will fit any system, but that’s not always the case. Make sure to check that the cooler is compatible with your CPU socket and fits inside your case. Some larger air coolers might not fit in smaller cases, and liquid coolers require certain mounting points for the radiator.
Over-Tightening the Cooler
While it’s important to secure the cooler, over-tightening the screws can damage the cooler, motherboard, or even the CPU. Tighten the screws just enough to hold the cooler in place without forcing them too hard.
| Sai lầm | Sự miêu tả | Giải pháp |
|---|---|---|
| Too much thermal paste | Excess paste causes poor heat transfer | Use a small, pea-sized amount |
| Forgetting compatibility | Wrong cooler size or socket type | Always check socket compatibility |
| Over-tightening the cooler | Damages the cooler or motherboard | Tighten screws evenly and gently |
11. How Can You Maintain Your CPU Cooler for Longevity?
To ensure that your CPU cooler continues to perform well over time, regular maintenance is key. But here’s the kicker—keeping your cooler clean and well-maintained will not only improve its lifespan but also the overall performance of your system.
Cleaning the Cooler
Dust buildup is one of the biggest threats to CPU coolers. Over time, dust accumulates on the fan blades and heatsink, obstructing airflow and reducing cooling efficiency. Use a can of compressed air to blow out the dust from the cooler and fans. If necessary, carefully wipe the fan blades with a soft cloth.
Checking Fan Functionality
The cooler fan can wear out over time, especially if it’s a high-performance model that’s been running constantly. Periodically check the fan to ensure it’s spinning freely and quietly. If it’s making strange noises or isn’t spinning at all, it may need to be replaced.
Reapplying Thermal Paste
After about two years of use, it’s a good idea to reapply thermal paste. The paste can degrade over time, reducing its effectiveness. Remove the old paste with rubbing alcohol, apply a fresh layer, and reinstall the cooler.
| Maintenance Task | Tính thường xuyên | Tool/Material Needed |
|---|---|---|
| Clean cooler and fans | Mỗi 3-6 tháng | Compressed air, cloth |
| Check fan functionality | Mỗi 6 tháng | None |
| Bôi lại keo tản nhiệt | Every 2 years | Rubbing alcohol, thermal paste |
12. What Should You Do if Your CPU Cooler Stops Working?
A non-functional CPU cooler is a serious issue that can lead to system instability. What’s the real story here? Don’t panic—there are steps you can take to diagnose and fix the problem before it causes permanent damage to your hardware.
Troubleshooting the Cooler
First, ensure that the fan is receiving power. Check the fan header connection on the motherboard. If the fan is spinning slowly or not at all, try plugging it into a different fan header to see if the issue lies with the header.
Replacing the Cooler
If the fan isn’t working and the cooler is out of warranty, you may need to replace it. When purchasing a new cooler, consider upgrading to a more efficient model if your old one was underperforming. It’s essential to select a cooler that fits your case and CPU socket.
Warranty Considerations
If your cooler is under warranty, contact the manufacturer for a replacement. Most coolers come with a warranty period of at least a year, and replacing faulty components should be a smooth process.
| Vấn đề | Giải pháp | Next Step |
|---|---|---|
| Fan not spinning | Check power connection | Test fan header, replace fan |
| Cooler underperforming | Check mounting and paste | Reinstall or replace cooler |
| Cooler still under warranty | Contact manufacturer | Request replacement |
13. Can Installing a CPU Cooler Affect Your System’s Performance?
You might be wondering—can a CPU cooler really impact my system’s performance? The answer is a resounding yes! The CPU cooler plays a vital role in ensuring your system remains cool under load, which directly affects its performance.
Cooling and CPU Performance
A cooler CPU can operate at higher clock speeds without throttling. This is especially important for gamers and professionals who rely on maximum performance. By keeping the CPU temperature low, the cooler ensures that your processor can run at full capacity without compromising stability.
Overclocking Potential
If you’re into overclocking, a better cooler allows you to push your CPU to higher speeds without overheating. Liquid coolers, in particular, are known for their ability to handle the extra heat generated by overclocking, making them ideal for users who demand the highest possible performance.
System Longevity
Over time, excessive heat can damage a CPU and other internal components. A proper cooler not only boosts performance but also extends the lifespan of your hardware. By investing in a quality cooler, you’re protecting your system from long-term damage.
| Performance Factor | Máy làm mát không khí | Liquid Cooler |
|---|---|---|
| Hiệu quả làm mát | Vừa phải | Cao |
| Overclocking Capability | Limited | Advanced |
| System Longevity | Tốt | Xuất sắc |
14. What Are Some Popular CPU Cooler Brands and Their Reviews?
When choosing a CPU cooler, brand reputation matters. So, what’s the real story? Some brands consistently produce high-quality coolers that offer excellent performance, while others may fall short. Here’s a look at some of the top brands on the market.
Noctua
Noctua is known for its high-performance air coolers. The company’s coolers are renowned for their quiet operation and excellent thermal performance. They may come at a higher price point, but they’re well worth the investment for serious gamers and overclockers.
Corsair
Corsair offers both air and liquid coolers. Their Hydro Series liquid coolers are particularly popular among enthusiasts who want top-tier cooling without sacrificing noise levels. Corsair products are known for being reliable and easy to install.
NZXT
NZXT is another brand that offers a wide range of liquid coolers, including their Kraken series. Their coolers are sleek and feature customizable RGB lighting, making them a popular choice among users who value aesthetics as well as performance.
| Brand | Product Type | Notable Features | Phạm vi giá |
|---|---|---|---|
| Noctua | Air coolers | Quiet, efficient cooling | $50 – $100 |
| Corsair | Air & Liquid | High performance, easy setup | $70 – $200 |
| NZXT | Liquid coolers | Customizable RGB, great aesthetics | $100 – $150 |
15. How Much Does a CPU Cooler Cost and What’s the Best Value?
Understanding the cost of a CPU cooler is essential for budget-conscious buyers. But here’s the kicker—choosing the best value doesn’t always mean going for the cheapest option. The cost of a cooler depends on its type, brand, and performance features.
Budget Options
If you’re on a tight budget, air coolers are the way to go. You can find reliable options for as little as $30 to $50. These coolers will be suitable for most users who don’t plan to overclock or need heavy-duty cooling.
Mid-Range Coolers
For users who need better performance without breaking the bank, mid-range air or liquid coolers are available for around $80 to $120. These coolers offer better thermal performance and may come with features like quieter fans or RGB lighting.
Premium Coolers
At the top end, liquid coolers or high-performance air coolers can cost over $150. These are the best options for overclockers or high-end gaming builds, offering superior cooling and noise reduction.
| Loại máy làm mát | Phạm vi giá | Tốt nhất cho |
|---|---|---|
| Budget Air Cooler | $30 – $50 | General use, non-overclocking |
| Mid-Range Cooler | $80 – $120 | Users needing better cooling |
| Premium Cooler | $150+ | Overclocking, high-performance |
By understanding the costs and benefits of each type of cooler, you can choose the one that fits your needs and budget while ensuring your system stays cool and performs optimally.
Phần Câu hỏi thường gặp
Câu hỏi 1: Bộ tản nhiệt CPU là gì?
A CPU cooler is a device designed to dissipate the heat produced by the CPU, ensuring that it remains within safe operating temperatures.
Câu hỏi 2: Bộ tản nhiệt CPU hoạt động như thế nào?
A CPU cooler works by absorbing heat from the CPU and transferring it to a heatsink or liquid system, where it is expelled through a fan or radiator.
Câu hỏi 3: Can I install a CPU cooler myself?
Yes, installing a CPU cooler is straightforward if you follow the steps carefully. Most users with basic technical knowledge can handle the installation.
Câu hỏi 4: How do I know if my CPU cooler is installed correctly?
Ensure the cooler is securely attached, the fan is spinning, and the CPU temperature is within normal ranges. Use monitoring software to check CPU temps.
Câu hỏi 5: How often should I clean my CPU cooler?
Cleaning your CPU cooler every 3-6 months is recommended to prevent dust buildup, which can reduce cooling efficiency.
This guide has walked you through the process of selecting, preparing, and installing a CPU cooler. With the right tools and a bit of patience, you can ensure your CPU stays cool and your system performs at its best.
